SpringSecurity [AccessDecisionManager]
우리는 보통 스프링 시큐리티를 사용할때
인증부터 시작한다. 인증을 해야 인가를 하든말든 선택을 할 수 있기 때문이다.
인가는 " 허용할 것인가 ? " 라고 생각하면 될 것이다.
웹 요청 , 메서드콜 등 서버로 요청을 보낼때. "이것을 허용할 것인가?" 의 역할이다.
이때 이 부분 "이것을 허용할 것인가?"를 담당하는 인터페이스가 오늘의 주제
AccessDecisionManager 이다.
이 Manager 익숙하다 .. AuthenticationManager 과 유사한데 이것은 Authentication객체를 만들어
'인증'을 하는데 사용되는 것이고
AccessDecisionManager 는 '인가' 이다.
AccassDecisionManager 를 공부하는데 가장 핵심은 Voter 다.
Voter를 여러개 가질 수 있는데 필터랑 비슷하다고 생각하면 된다.
여기서도 FilterChainProxy처럼 하나하나 대조하고 필터를 확인 시켜주는 역할 을 하는애가 있는데
바로 AccessDesicionVoter 이다.
AccessDesicionVoter 는
지금의 [ 유저 Authentication ] 가 특정한 객체에 접근을 할때 [ConfigAttributes]를 만족하는지 확인한다.
ConfigAttributes 는 getAttribute()로 접근 한다. --> 권한통과 조건은 경로에 따라 또는
접근하고자 하는 메서드에 따라 달라진다.
쉽게 말하면 각각의 경로,메서드가 조건이 다르다는 것인데
이 때, 각각의 경로, 메서드가 가진 조건을 담는데 쓰이는 객체가 ConfigAttribute 이다.
ConfigAttribute ... 그냥 넘어가자니 중요해 보여서 미안한데 잠시 삼천포로 빠진다.. 필요하면 펼쳐서 봐주길
http.authorizeRequests()
.mvcMatchers().("/only/admin").hasRole("ADMIN");
라는 SecurityConfig 설정을 했다고 가정한다.
이때 우리는 /only/admin 이라는 경로에 대해서 조건을 가지게 된다. "ROLE_ADMIN"
즉, /only/admin 경로는 "ROLE_ADMIN"이라는 ConfigAttribute 통과 조건이 생겼다.
두번째 가정 Controller, Service class 에서
@Secured{"ROLE_USER"}
public ResponseEntity getUser(){
....................
}
@Secured 라는 어노테이션을 사용 했다면
SecuredAnnotationSecurityMetadataSource 에 의해서 , getUser()는 "ROLE_USER" 라는 ConfigAttribute 가 생성된다.
다시 AccessDecisionManger로 돌아와서 AccessDecisionManger는 3가지의 구현체가 존재한다.
- AffirmativeBased (기본 전략) : Voter들중 하나라도 허용하면 허용.
- ConsensusBased : 다수결에 따라 허용
- UnanimousBased : 만장일치일 때만 허용
AffirmativeBased . class (feat. Voter)
public class AffirmativeBased extends AbstractAccessDecisionManager {

   public AffirmativeBased(List<AccessDecisionVoter<?>> decisionVoters) {
      super(decisionVoters);
   }

   /**
    * This concrete implementation simply polls all configured
    * {@link AccessDecisionVoter}s and grants access if any
    * <code>AccessDecisionVoter</code> voted affirmatively. Denies access only if there
    * was a deny vote AND no affirmative votes.
    * <p>
    * If every <code>AccessDecisionVoter</code> abstained from voting, the decision will
    * be based on the {@link #isAllowIfAllAbstainDecisions()} property (defaults to
    * false).
    * </p>
    * @param authentication the caller invoking the method
    * @param object the secured object
    * @param configAttributes the configuration attributes associated with the method
    * being invoked
    * @throws AccessDeniedException if access is denied
    */
   @Override
   @SuppressWarnings({ "rawtypes", "unchecked" })
   public void decide(Authentication authentication, Object object, Collection<ConfigAttribute> configAttributes)
         throws AccessDeniedException {
      int deny = 0;
      for (AccessDecisionVoter voter : getDecisionVoters())
         int result = voter.vote(authentication, object, configAttributes); ------------[1]
         switch (result) {
         case AccessDecisionVoter.ACCESS_GRANTED:
            return;
         case AccessDecisionVoter.ACCESS_DENIED:
            deny++;
            break;
         default:
            break;
         }
      }
      if (deny > 0) {
         throw new AccessDeniedException(
               this.messages.getMessage("AbstractAccessDecisionManager.accessDenied", "Access is denied"));
      }
      // To get this far, every AccessDecisionVoter abstained
      checkAllowIfAllAbstainDecisions();
   }

}
[1] 에 디버깅을 넣어놓고 permitAll url 로 들어가 보도록 한다.

permitAll 이라는 ConfigAttributes가 생성되었다.
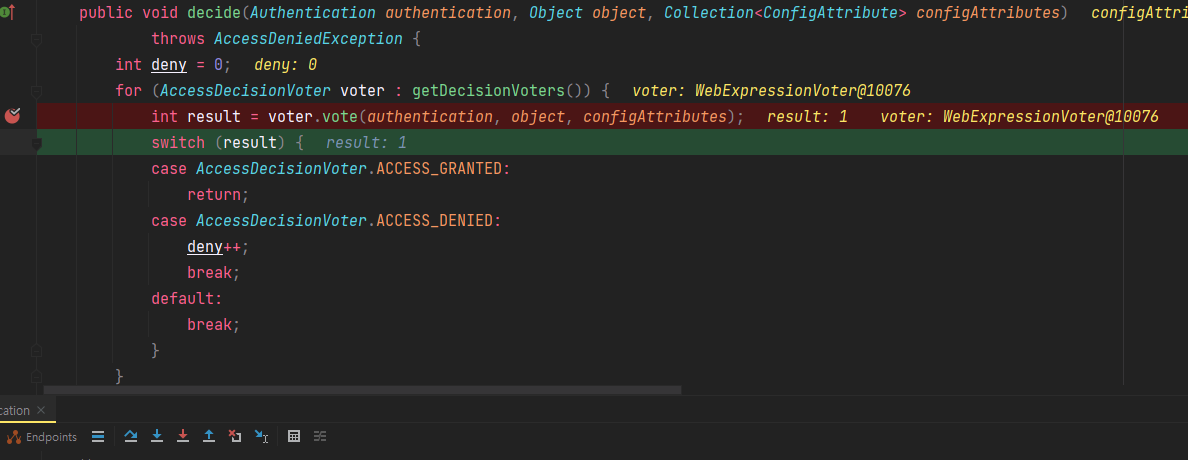
WebExpresstionVoter 가 1이라는 대답을 내놓았는데
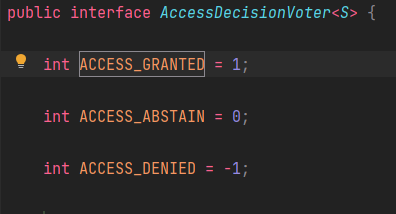
1은 승인, 0은 주의 ,-1 거절이다.
자 이제 어느 정도 인가가 어떻게 진행이 되는지 알았다. 여기까지만 읽어도 충분하지만
내 프로잭트 내부에 이상한 문제점이 있었다.
Admin 만 접근가능한 페이지가 있고
User 만 접근 가능한 페이지가 있다고 보자.
근데 우리는 당연하게도 Admin 계정이라면 User 접근 가능 페이지도 접근이 가능해야한다 생각하지만
그게 안된다...
우리가 Admin, User role만 있다면 문제가 되지않지만 만약 권한이 세분화 될 경우
permitAll() 로 퉁쳣다가는 문제가 반드시 발생할 것이다.
연습 예제로 User만 접근 가능한 페이지를 Admin 도 접근이 가능하도록 해보자 .
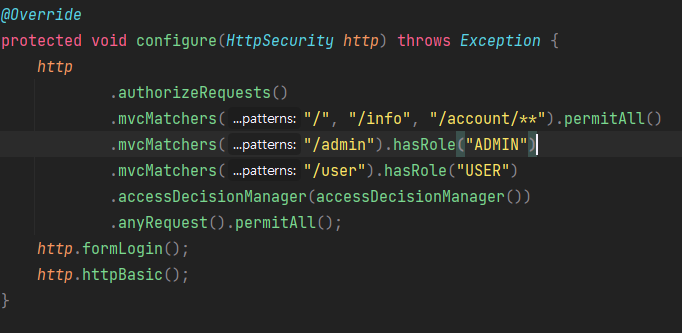
보면 /user 는 "USER"만 접근 가능하다.
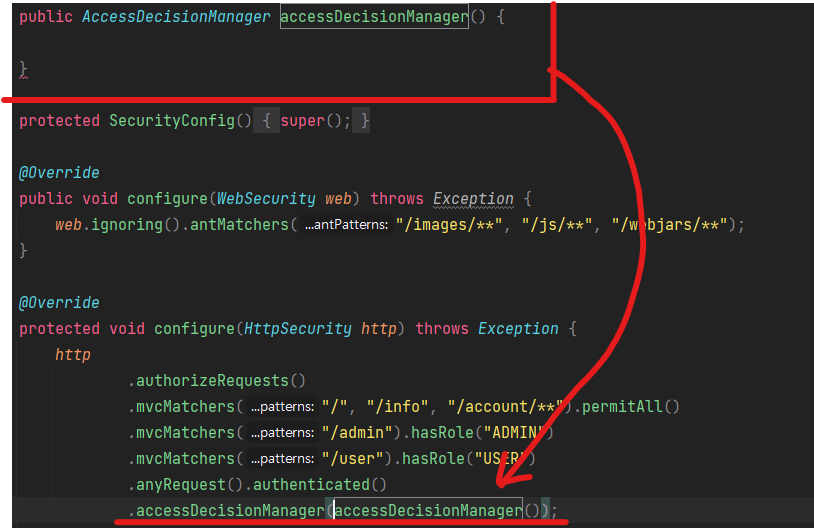
AccessDecisionManager 객체 를 돌려주는 메소드를 만들고
SecurityConfig Http 설정에 추가 한다.
이제 메소드 로직을 설정할 텐데 .
1. AccessDecisionManager 는 리스트 형태의 AccessDecisionVoter<?> 를 사용한다.

2. AccessDecisionVoter<?> 는 또 WebExpressionVoter를 사용한다.
3.WebExpressionVoter는 DefaultWebSecurityExpressionHandler를 사용한다.

4.DefaultWebSecurityExpressionHandler는 setRoleHierarchy(); 를 사용해서 RoleHierarchy 객체를 사용한다.


5. RoleHierarchy 객체는 setHierarchy(String roleHierarchyStringRepresentation)을 통해 생성이 가능하다.

최종 코드
public AccessDecisionManager accessDecisionManager(){

    RoleHierarchyImpl roleHierarchy = new RoleHierarchyImpl();
    roleHierarchy.setHierarchy("ROLE_ADMIN > ROLE_USER");

    DefaultWebSecurityExpressionHandler handler = new DefaultWebSecurityExpressionHandler();
    handler.setRoleHierarchy(roleHierarchy);

    WebExpressionVoter webExpressionVoter = new WebExpressionVoter();
    webExpressionVoter.setExpressionHandler(handler);

    List<AccessDecisionVoter<?>> accessDecisionVoters = Collections.singletonList(webExpressionVoter);


    return new AffirmativeBased(accessDecisionVoters);
}
이제 우리도 User 만 접근 가능한 페이지를 Admin도 접근이 가능해졌다.
혹시나 코드가 너무 길다고 생각이 든다면 . 더 윗단계로 올라가서 설정을 해주면된다.

expressionHandler 를 사용해서 넣어주면 되는데.
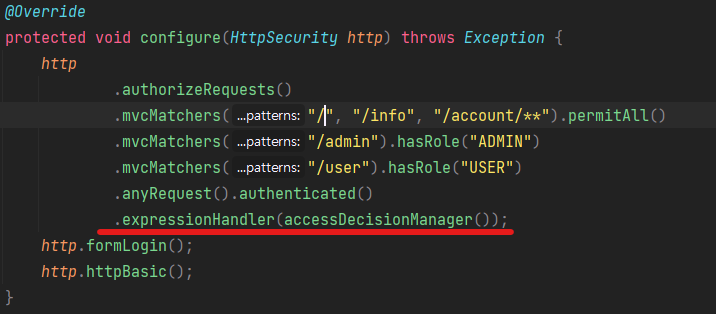
위에서 4,5 번만 해주면 되는 것이다.
expressionHandler 가 사용하는 것들만 뽑아서 넣어주면 된다. 즉
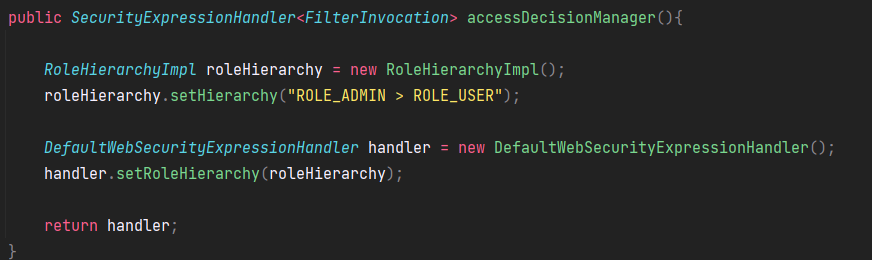
이렇게 간소화 된다.